Saturday, July 24, 2010

The canvas: Drawing in HTML 5

In HTML 5 we can now draw shapes with the help of canvas element. I found it really interesting and easy to manipulate these drawing functions. Let's have some fun with drawing! I am going to draw some rectangles of different colors at different locations of page. To accomplish this, first we need to add a canvas element in our HTML body:


Our code looks like this:
<html>
<head>
</head>
<body>

</body>
</html> 

Our next step is to draw some rectangles in canvas. In HTML 5 there is a function fillRect(x, y, width, height) to draw a filled rectangle, here x and y represents position of the rectangle. Let me first show you the complete code then we analyze this line by line.
<html>
<head>
<title></title> 

</head>
<body onload="drawRectangles()">

Your browser does not support HTML 5.

</body>
</html>

You may have noticed "Your browser does not support HTML 5." between <canvas> tags, this is a fallback text. If your browser does not support HTML 5 you will see this message or alternatively we can put some work around here to support lower versions of HTML 5. I am calling a function drawRectangles() onload event of body. In this function I am getting the canvas object as we normally do:

var canvas = document.getElementById("canvas");

After getting this canvas object I am getting its context:

var ctx = canvas.getContext("2d");

An argument 2d is passed in getContext function, you cannot get 3d context by passing 3d in function. "This specification only defines one context, with the name '2d'". “A future version of this specification will probably define a 3d context.”

After this I am defining an color array which will be used to fill our rectangles.
Notice one thing, at first index of array I am passing RGB (Red, Green, Blue) value while for all others I am passing RGBA (Red, Green, Blue, Alpha) just to show it supports transparency. Right after colors' array, width, height, x and y variables are initialized with values.
var colors = [
"rgb(200, 51, 51)",
"rgba(200, 200, 51, 0.5)",
"rgba(200, 151, 151, 0.5)",
"rgba(50, 51, 51, 0.5)",
"rgba(20, 251, 151, 0.5)"
];                         
var width = 100;        // width of rectangle
var height = 100;       // height of rectangle
var x = 30;             // x position of rectangle
var y = 30;             // y positioin of rectangle


Then I am checking for context ctx object for null so that I can draw only on supporting browsers. Next I am drawing rectangles of all colors found in array, as you see only 5 rectangles. In ctx.fillStyle I am giving color to fill rectangle. We can also give colors like this ctx.fillStyle = "#FFCC00" or ctx.fillStyle="rgb(255, 99, 00) as we are doing right now.
Then comes our ctx.fillRect method to actually draw a filled rectangle. After this line, we are incrementing x and y to draw next rectangles at different locations.
if (ctx){
for(var i=0; i < colors.length; i++){
ctx.fillStyle = colors[i];
ctx.fillRect(x, y, width, height); 
x += 30;
y += 30;
}
}


The output of this code looks like this:
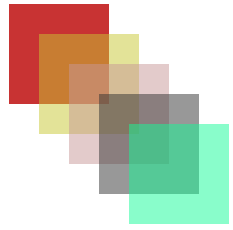


Further if we want to draw border around our rectangles we will use strokeRect(x, y, width, height) function and to color our border strokeStyle property will be used. Now our code looks like this:
if (ctx){
for(var i=0; i < colors.length; i++){
ctx.fillStyle = colors[i];
ctx.fillRect(x, y, width, height);
ctx.strokeStyle = "#EEE"; 
ctx.strokeRect(x, y, width, height);
x += 30;
y += 30;
}
}

This code generates following output, notice borders around rectangles:

Saturday, July 17, 2010

Dynamic and Extendable CSS

CSS, Cascading Style Sheet, does not allow the usage of variables and functions. Each time you have to assign values to properties. Later on, if you have to change some primary color, width or border etc. you have to manually change every place. .LESS (Dot Less) is a free, open-source port of LESS library of Ruby. It provides you the functionality of using vairables, mixins (I call it functions, for ease), nested rules and operations on variables. .Less is also the extension of the file. All variable declarations and their usage, functions, nested rules and all css content will be in this file. I recently used it in my project and I found it very useful.

Like any programing language you can declare variables and can perform operations on those. "Variables allow you to specify widely used values in a single place, and then re-use those throughout the style sheet, making global changes as easy as changing one line of code.

Here is the example of variable usage and plus (+) operation,
@MainColor:#cc4c4c;
.heading{
color: @MainColor + #987;
font-weight:bold;
text-align:center;
font-weight:bold;
font-size:16pt;
}
Mixins are like functions you can pass parameter values or can use a default value parameter, "Mixins allow you to embed all the properties of a class into another class by simply including the class name as one of its properties.

In this sample code we make a function 'border' and it takes a parameter color, default is set to black color:
.border(@color:#000){
border:solid 1px @color;
}
.leftContent{
background-color:@LeftContent;
.border(@LeftContent - #333); /* Example of Mixin usage, passing color*/
float:left;
width:200px;
min-height:400px;
margin:3px;
text-align:@ContentAlignment;
.roundRightCorners(15px); /* Example of Mixin usage, just called like a function*/
}
Nested Rules helps to avoid long selector names, you can nest selectors inside other selectors.

For example,
#header{
background-color:@MainColor; /* Example of variable usage */
height:@HeaderHeight;
border:solid 1px (@MainColor - #333); /* Example of variable usage and Operations */
line-height:@HeaderHeight;
vertical-align:middle;

.heading{
color: @MainColor + #987;
font-weight:bold;
text-align:center;
font-weight:bold;
font-size:16pt;
}
}
Otherwise in CSS we will do:
#header {
//List of properties
}

#header .heading:
//List of properties
}
We will save our file with extension .less instead of .css and we have to do some settings in web.config for its handling. So lets start step by step.

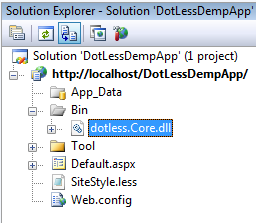
1. Add a reference of dotless.Core.dll in you web site.


2. Add dotless section in your web.config.


3. Configure caching and minifying of css.


4. Add httpHandler to parse your .less file.


5. Add a .less file, if you dont have before, and add css classes and use variables, mixins etc in it. Here is a sample .less file.

/* Variables */

@MainColor:#cc4c4c;
@HeaderHeight:70px;
@LeftContent: #ffffaa;
@RightContent: #bafadb;
@ContentAlignment:center;

body{
margin:0px;
}

#main{
width:1024px;
}

#header{
background-color:@MainColor; /* Example of variable usage */
height:@HeaderHeight;
border:solid 1px (@MainColor - #333); /* Example of variable usage and Operations */
line-height:@HeaderHeight;
vertical-align:middle;
.heading{
color: @MainColor + #987;
font-weight:bold;
text-align:center;
font-weight:bold;
font-size:16pt;
}

}

/* Mixins */

.roundRightCorners (@radius: 5px) {
-moz-border-radius-bottomright: @radius;
-moz-border-radius-topright: @radius;
border-radius: @radius;
}

.roundLeftCorners (@radius: 5px) {
-moz-border-radius-bottomleft: @radius;
-moz-border-radius-topleft: @radius;
border-radius: @radius;
}

.border(@color:#000){
border:solid 1px @color;
}

/* Nested Rules*/

#contents{
color: (@MainColor - #444444); 
a{
text-decoration:none;
color: (@MainColor - #444444); 
}

a:hover, a.hover{
color: (@MainColor + #444444);
}

a:visited{
color: (@MainColor + #444444); 
}

.leftContent{
background-color:@LeftContent;
.border(@LeftContent - #333); /* Example of Mixin usage, passing color*/
float:left;
width:200px;
min-height:400px;
margin:3px; 
text-align:@ContentAlignment;
.roundRightCorners(15px); /* Example of Mixin usage, just called like a function*/
}

.rightContent{
background-color:@RightContent;  
.border(@RightContent - #333); /* Example of Mixin usage, passing color*/
min-height:400px; 
margin-top:3px;
float:left;
width:814px; 
text-align:@ContentAlignment;
.roundLeftCorners(15px); /* Example of Mixin usage, just called like a function*/
}

}
6. Use this .less file in your website instead of .css.
<link rel="Stylesheet" href="SiteStyle.less" />

That is all, now you can access your website as you normally do.

In the attaced Demo application there is a folder named Tool, in this folder a file dotless.Compiler.exe resides. This is a command line utility. If you do not want to use dotless handlers than you can use this utility to generate .css files from .less files. You can also obtain minify .css from .less. These are the available options in dotless compiler:


To generate style sheet .css file you have to run following command (adjust paths according to your directory structure):


C:/inetpub/wwwroot/DotLessDempAppTool>dotless.Compiler.exe -m ../Sitestyle.less ../SitesStyle.css

This will generate the SitesStyle.css minified file.